Newforms, part 1
If you’ve ever had the pleasure (and I use that term somewhat loosely) of working with Django’s original form-processing system (which now lives in django.oldforms and is in the process of being deprecated), you’ll know that the replacement currently under development (which currently lives in django.newforms and will eventually become simply django.forms) represents an immense simplification and adds quite a few capabilities which weren’t present before. But because it’s still quite new (and parts of it are still being developed), it’s still not fully documented, and so can be a bit tricky to wrap your head around for the first time. So in the next couple of articles, let’s take a look at newforms and get to know what makes it tick and how to use it effectively.
Understanding a newforms form
A newforms form, though easy to work with once you get the hang of it, has several parts which all need to work together to achieve the ultimate goal: displaying an HTML form, accepting the data entered into it, validating that data and finally returning a collection of values — converted to the appropriate Python data types — for further processing. This diagram shows the major parts and where they fit in:
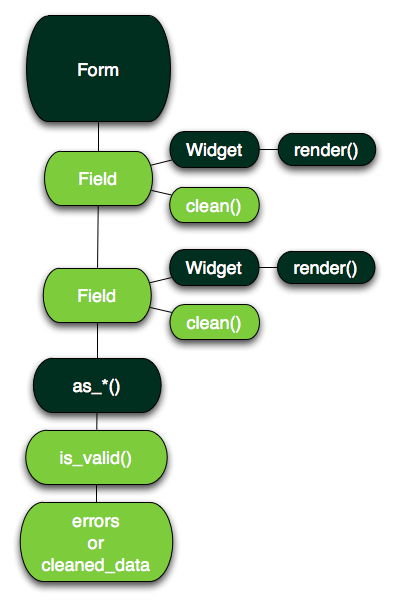
Let’s dive in and see how each of these parts works.
The Form class
All newforms forms ultimately inherit from the base class django.newforms.Form, which handles the heavy lifting: Form knows how to accept data from an HTTP request, feed it into the fields (which we’ll cover momentarily), check the validity of the data, print out an appropriate HTML form and — once you have valid data — return it as the appropriate Python data types.
There are three ways you can create an instance of a form, depending on the particular situation; if, for example, you have a form class named MyForm, the simplest method is to just instantiate it:
form = MyForm()
This creates an unbound instance of the form — one that doesn’t have any data to work with — and is suitable for the first time you show the form to a user (since they won’t have had a chance to enter any data yet). Alternatively, once there is some data, you can simply pass it in to create a bound instance, which will then work on the data you’ve given to it. Generally, you do this in a view by testing to see if the HTTP method was POST, which means data was submitted with the request:
if request.method == 'POST':
    form = MyForm(request.POST)
else:
    form = MyForm()
The above code will bind the form to the request’s POST data if it exists, and otherwise creates an unbound (blank) form to display to the user.
The third method comes into play when you’re also accepting file uploads as part of the submission; uploaded files go into request.FILES, not request.POST, so you need to pass both of those into the form:
form = MyForm(request.POST, request.FILES)
Note that when you’re accepting file uploads, the HTML form element needs to have the attribute enctype="multipart/form-data" added to it; you can test whether a form requires this by calling its is_multipart() method, which will return True when the form will need this in order to enable file uploads.
Once you’ve bound some data to a form, finding out whether it’s valid is as simple as calling its is_valid() method; this will return True if there were no validation errors, and False otherwise. If is_valid() returns True, the final data — converted to the correct Python types for each field — will be available in the attribute cleaned_data, which will be a dictionary whose keys are the names of the fields. If the form isn’t valid, the attribtute errors will contain a dictionary of error messages, again keyed to field names.
Displaying a form
For display in a rendered web page, getting a form to print itself is relatively easy; in the simplest case, you can just pass the form object itself (by convention, as a variable named form) into the template context, and then use that variable to show the form. For example:
<form method="post" action="/submit/">
<table>
{{ form }}
<tr>
  <td><input type="submit" value="Submit" /></td>
</tr>
</table>
</form>
This works because the default string representation of a form is as a table, with each field inside a tr (within each tr, the field label goes inside a label in a th, and the actual field itself goes into a td containing an appropriate HTML input element). Note that the form does not automatically print the enclosing form tags (which you need to supply on your own, since the form doesn’t know the URL to which it should submit, or the HTTP method it should use), nor does it include a “submit” button (since you may need to customize that from form to form, or include multiple buttons for things like clearing or canceling submission).
You can also use any of three methods on the form to cause it to print itself in various ways:
as_table(), which is what’s used above for the default behavior, prints out the fields in a table, one pertr(though you’ll need to provide the surroundingtabletags yourself).as_p()will print each field inside apelement.as_ul()will print each field inside anlielement, suitable for display inside an HTML list (though, again, you need to manually supply the surroundinguloroltags).
So the following is equivalent to the above sample:
<form method="post" action="/submit/">
<table>
{{ form.as_table }}
<tr>
  <td><input type="submit" value="Submit" /></td>
</tr>
</table>
</form>
For finer-grained control over the HTML, you can also output each field individually; for example, a registration form with username, email and password fields could be displayed inside a definition list like so:
<form method="post" action="/accounts/register/">
<dl>
<dt><label for="id_username">Username:</label></dt>
<dd>{{ form.username }}</dd>
<dt><label for="id_email">E-mail address:</label></dt>
<dd>{{ form.email }}</dd>
<dt><label for="id_password">Password:</label></dt>
<dd>{{ form.password }}</dd>
<dd><input type="submit" value="Submit" /></dd>
</dl>
</form>
If the form has errors, you can use {% if form.errors %} in your template to determine whether to display them, and you can also check for the errors on individual fields; for example, in the registration form example above you might use {% if form.username.errors %} to check for errors on the username field; if they exist, they’ll be a list, so using Django’s built-in join template filter — for example, {{ form.username.errors|join:", " }} — would let you display them correctly.
There are a number of other options for controlling the HTML output of a form, including customizing the labels and the HTML id attributes of the form fields; these are covered in the official newforms documentation.
Fields
Of course, a Form subclass is pretty useless all by itself, because it can’t accept any data and wouldn’t know what to do with it if it could; to handle that, we need to turn to fields, which are the second major component of newforms forms. If you’ve ever written a Django model class, you’ll be right at home here because adding fields to a form works in a way that’s very similar to adding fields to a model. Consider the following simple user model:
from django.db import models
class User(models.Model): username = models.CharField(max_length=100) email = models.EmailField() password = models.CharField(max_length=100)
With a corresponding form which could be used to sign up new users:
from django import newforms as forms
class UserForm(forms.Form): username = forms.CharField(max_length=100) email = forms.EmailField() password = forms.CharField(max_length=100)
Even though the fields in each case represent different things (model fields represent columns storing data in the database, form fields represent different inputs in the HTML form which will be validated), the mechanism you use for setting them up is similar: you simply list them out in the definition of the class, specifying a name and type for each one as you go.
Each field class inherits from django.newforms.Field, and defines a method named clean(), which accepts a value and either:
- Converts the value to the correct Python data type and returns it, if it passed validation, or
- Raises
django.newforms.ValidationError.
The clean() method is free to do pretty much anything it likes to the value to validate it; some fields use regular expressions to test the value, for example, others verify that the value comes from a selection of allowed choices, and still others look at length or numeric properties. If you ever need to write your own custom Field subclass, clean() is where you’ll probably do most of the work.
Each field also has (typically through the base Field class) methods for collecting and organizing its error messages, and for determining what sort of widget it will use and what attributes that widget will have (we’ll cover widgets in just a moment).
Widgets
Widgets are the other main component of a newforms form; each field on the form has to be able to render to the appropriate HTML and retrieve the correct value from the form submission for validation, and that’s the job of the widget. Most fields will only have one widget, but not all; DateTimeField, for example, uses two widgets: one for the date portion of the value, and one for the time.
If you don’t specify a widget when adding a field to a form, the field will fall back to a default widget, which varies from one field to the next; CharField, for example, defaults to using the TextInput widget, while BooleanField defaults to the CheckBoxInput widget. Each widget’s constructor optionally accepts an argument called attrs, which should be a dictionary; the keys and values of the dictionary will become HTML attributes and values when the widget is rendered (this lets you specify a custom HTML class attribute for a particular widget, for example).
The most important method on a widget, from the perspective of most forms, is render(), which is the method which actually builds up the HTML string containing the appropriate input element, including any custom attributes passed in. Each widget also has a method get_value_from_datadict(), which is responsible for identifying the value submitted through the HTML input generated by that widget, and a couple of useful attributes:
is_hiddenspecifies whether the widget generates a non-visible HTML input element (e.g., aninputwithtype="hidden").needs_multipart_formspecifies whether this widget will require the form to have its HTMLenctypeattribute set tomultipart/form-data(this is how theis_multipart()method on forms, described above, works).
One thing which tends to trip people up as they start out with newforms is the fact that, because HTML rendering is handled exclusively by widgets, there aren’t separate field types for some common use cases; instead, a single field type is used, but with a different widget. For example:
- The old forms system had a separate
TextFieldandLargeTextField, which used aninput type="text"and atextarea, respectively. Innewforms, there’s justCharField, which uses theTextInputwidget —input type="text"— by default, but can be told to use theTextareawidget instead. - Similarly,
django.oldformshas aPasswordFieldwhich becomes aninput type="password"; innewforms, this just means using an existing field type (typicallyCharField) with thePasswordInputwidget.
The result is that newforms, as a whole, is much simpler and cleaner, and offers far greater flexibility in form presentation, but it can take a little time to get used to this.
How validation works
Now that we’ve got a handle on how the different parts of newforms come together to produce a form, it’s time to look at how newforms actually handles data validation. There are three different places where data validation can be handled; one is the clean() method of each field in the form, as we’ve already seen. The other two are methods on the form itself:
- If the form has a method named
clean(), it will be called to handle “form-level” validation; this is useful for validation which involves looking at multiple different fields. - Any method on the form whose name starts with “clean_” and ends with the name of a field in the form will also be called during validation; for example, if the form has a field named
usernameand a method namedclean_username(), it will be called. This is handy for situations where you don’t need a full-blownFieldsubclass, but still want a bit of custom validation for a specific field.
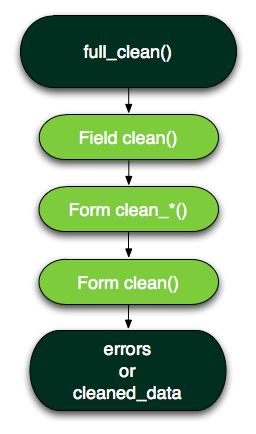
When you call the is_valid() method of a form, or check its errors attribute (which is actually a property and so does some behind-the-scenes calculations), the form’s full_clean() method is invoked. That, in turn, runs through each of the three validation steps in order, building up the dictionary which will eventually become cleaned_data if the data is valid, or the dictionary of error messages which will become errors if it isn’t. Here’s how it works:
- For each field on the form, have its widget identify the correct value from the data bound to the form, then pass that value to the field’s
clean()method, which either returns a value to add tocleaned_dataor raises a validation error. - For each form-level method which validates a specific field, call that method, which either returns a value to put into
cleaned_dataor raises a validation error. - Call the form’s
clean()method, which either returns the dictionary to use forcleaned_dataor raises a validation error.
If no validation errors were raised, is_valid() returns True, cleaned_data is filled with the validated data and errors is empty. If there were validation errors, is_valid() returns False, cleaned_data will not exist and errors will contain the error messages.
Let’s break for the day
That’s a lot to digest, so let’s stop here for the day; now that we have a solid understanding of the basics of newforms, tomorrow we’ll look at some real examples of developing and using forms in Django-based applications.